This post contains affiliate links. Please see our disclosure policy.

Elderberry syrup has long been recognized as an immune-booster. Packed with antioxidants, it’s a powerful cold preventative that can also support gut health. Fun fact: This syrup can also elevate your cocktails or be used as a syrup on waffles and pancakes.
If you enjoy my turmeric ginger shots for their immune-boosting benefits, you’ll love this elderberry syrup recipe. Elderberry is one of the most widely used medicinal plants out there, most often taken as a supplement for shortening and easing cold and flu symptoms. Beyond that, these little berries are packed with nutrients and are said to support heart health, fight inflammation, and even help the body ward off infections. Basically, elderberries have a lot going for them.
Ways to Use Elderberry Syrup
- Take 1-2 tablespoons daily during cold and flu season for extra immune support
- Stir into warm water or tea for a soothing drink
- Blend into smoothies or swirl into yogurt for a little boost
- Use as a sweetener in sauces, jams, and pies
- Shake into cocktails or mocktails for a tart, fruity note
- Drizzle over pancakes, waffles, or ice cream (you’re welcome)
- Fold into homemade jams, jellies, or syrups
Table of Contents
- Ways to Use Elderberry Syrup
- What Makes Elderberry So Good for You?
- Elderberry In Ancient Medicine
- Modern Studies With Elderberry
- Ingredients for Elderberry Syrup
- Important Cooking Notes
- How to Make Elderberry Syrup: Step-By-Step
- Sterilizing Methods
- How to Store Elderberry Syrup
- Frequently Asked Questions
- Easy Elderberry Syrup Recipe
- More Recipes for Cold & Flu Season…
What Makes Elderberry So Good for You?
- High in vitamin C
- Rich in fiber
- Contains phenolic acids and flavonols—potent antioxidants that help reduce oxidative stress
- Contains anthocyanins—the compounds that make them that deep purple-black color (and give them strong anti-inflammatory effects)
Elderberry In Ancient Medicine
Traditionally, Indigenous communities have turned to elderberry for fever and rheumatism, while ancient Egyptians swore by it for clearer skin and the healing of burns. Even today, it’s still foraged and used in folk medicine throughout Europe.
Modern Studies With Elderberry
More large-scale human studies are needed, but some studies (like this one, and this one) suggest that elderberry extract can help otherwise healthy individuals feel better several days sooner than usual, while also requiring fewer backup medications to manage symptoms due to the symptomatic relief elderberry offers. All signs point to elderberry being worth a closer look. High-quality research with well-made preparations could tell us even more about the real health benefits of this traditional remedy.
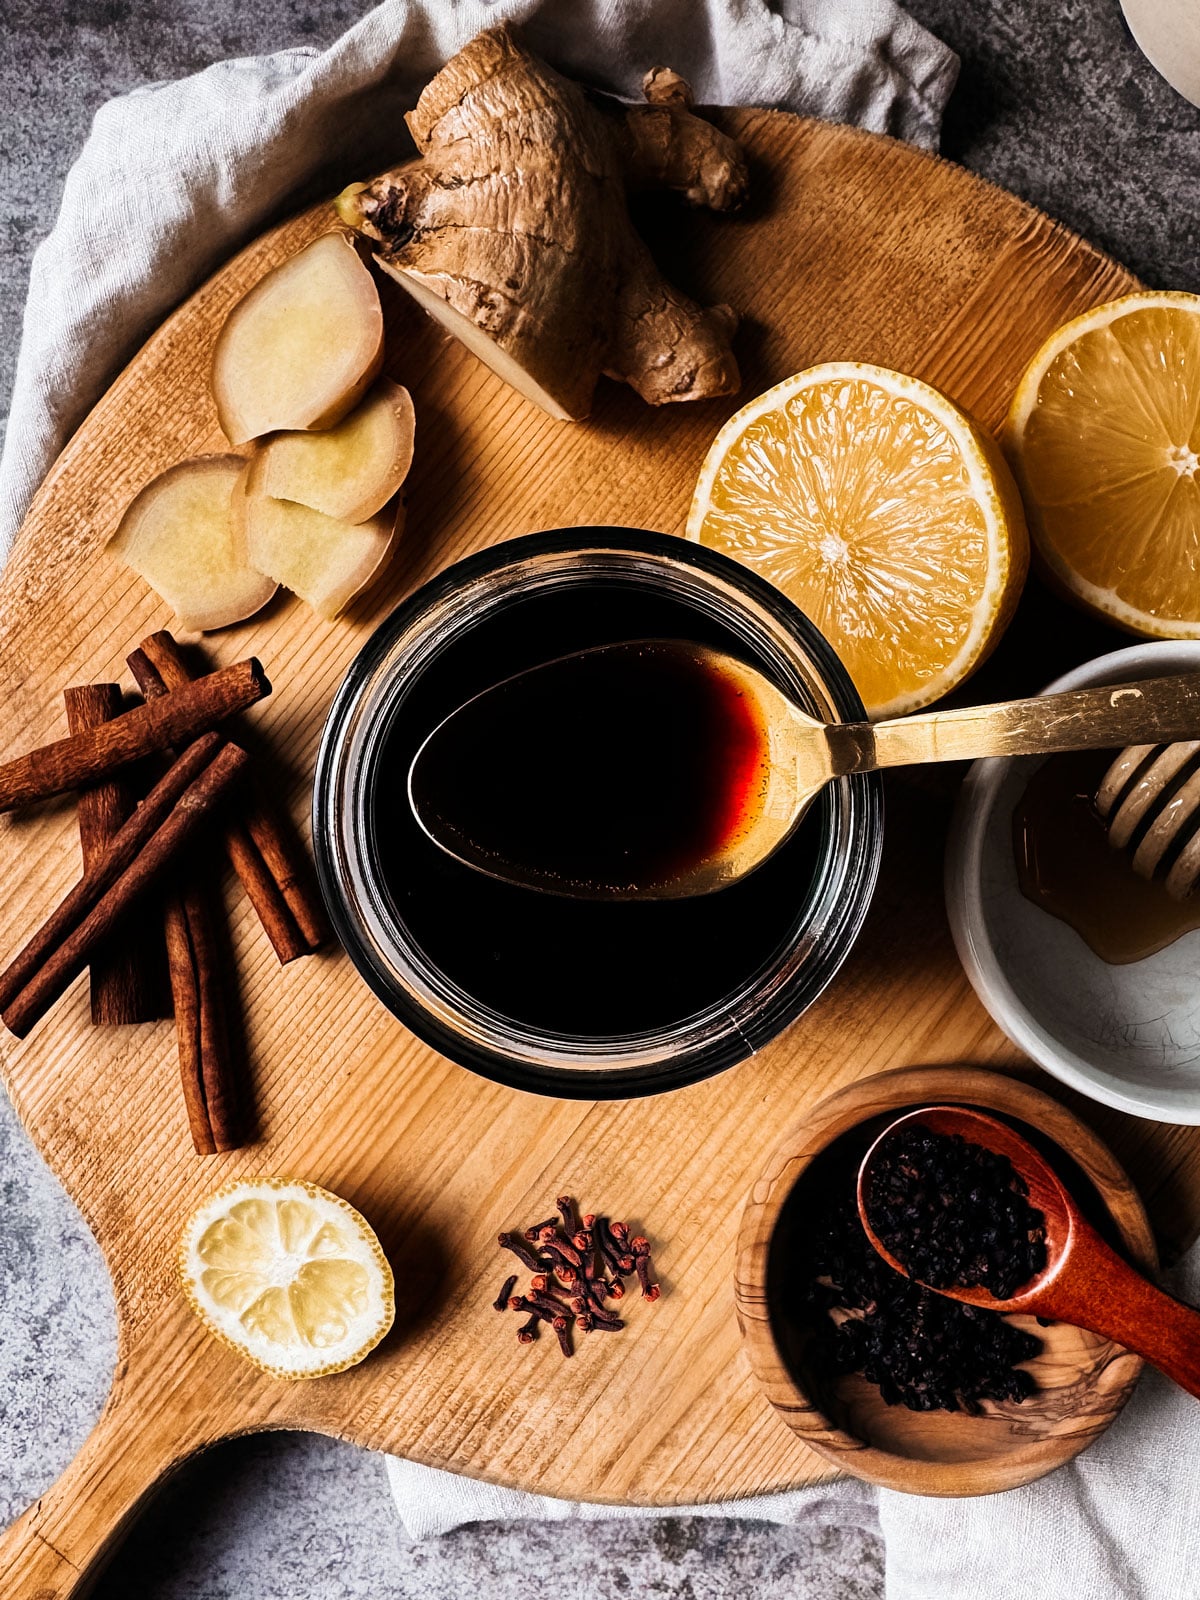
Ingredients for Elderberry Syrup

- Dried elderberries—These are easily accessible and much cleaner than fresh elderberries. This is the brand I like to use.
- Raw unfiltered honey—Not only does this sweeten the syrup and make it more enjoyable, but it also adds antioxidants and immune support. Manuka honey also works, thanks to its methylglyoxal (MGO), which packs a powerful antibacterial punch. But fair warning: it’s not cheap.
- Ginger root—Famous for aiding digestion, easing nausea, and giving your immune system a little boost.
- Cinnamon and cloves—Mostly incorporated into this recipe for flavor, these two spices also happen to offer up antioxidant properties.
- Lemon juice—Added to help preserve the syrup by lowering the pH. It also brightens the tartness of elderberries, adds a touch of sweetness, and packs in some vitamin C and antioxidants. Basically, it makes the syrup tastier and more stable when prepared properly.
Important Cooking Notes
- Use a sterilized jar—A sterilized jar keeps your elderberry syrup safe from germs, bacteria, and mold, helping it last longer. Properly cleaning and handling the syrup is crucial to preventing spoilage and maintaining its deliciousness.
- Thoroughly cook the berries—Cook the berries for at least 30 minutes. Bring them to a boil and then lower to a simmer until 30 minutes have passed. Raw elderberries, leaves, bark, and roots contain lectins and cyanide, which can cause nausea, vomiting, and diarrhea. Cooking the berries takes care of the cyanide, making them safe to eat.
- Only add honey once cooled—Long periods of high heat can destroy honey’s enzymes, vitamins, and antioxidants, stripping it of many of its benefits. Whisk it into the syrup only once it’s cooled to room temperature.
- Add lemon juice at the end—Lemon juice is also heat sensitive, so stir it in after the syrup has cooled to keep all those benefits intact.
How to Make Elderberry Syrup: Step-By-Step

Step 1: Sterilize Your Jar
I highly recommend sterilizing your glass jar before use. Sterilizing zaps the bacteria, mold, and yeast spores that could cause your syrup to go bad. Find my suggested methods here.
Step 2: Simmer the Ingredients
Place 1/2 cup of dried elderberries into a stainless steel saucepan along with the sliced ginger root, cinnamon sticks, and cloves. Add 2 cups of filtered water. Bring the contents to a rolling boil on the stove, stirring occasionally. Once the mixture reaches a boil, reduce the heat and simmer on low for 30 minutes.

Step 3: Strain the Syrup
Place a large bowl into the sink. Holding a sieve or strainer over the bowl, carefully pour the mixture through it so the strainer catches all of the solids and the liquid goes into the bowl. Using the back of a spoon, gently press down on the berries through the sieve to extract as much liquid as possible. When done, discard the solids in the sieve.
Step 4: Let the Syrup Cool
Let the bowl of syrup sit on the counter until it reaches room temperature. This should only take about 20-30 minutes.
Step 4: Add the Honey and Lemon Juice
Once the syrup has come to room temperature, whisk in the honey and fresh lemon juice until thoroughly combined.
Step 5: Transfer the Syrup Into the Jar
You can use a funnel to pour the syrup into the sterilized jar from the saucepan, which will help prevent spilling.
Sterilizing Methods
Boiling Water Method:
- Wash jars and lids in hot, soapy water and rinse well.
- Place the jars right-side up on a rack in a large pot or canner.
- Fill the pot with water to cover the jars by at least one inch.
- Bring the water to a rolling boil and boil for 10 minutes at sea level. Add one minute of boiling time for every 1,000 feet of elevation increase. (This matters!)
- Keep the jars in the hot water until ready to fill.
Dishwasher Method:
Some dishwashers have a sterilize cycle that can be used to sterilize jars. Ensure the dishwasher reaches a high enough temperature and maintains it for a sufficient duration to achieve sterilization.
Always refer to the latest guidelines from reputable food safety organizations for the most current and safe canning practices.

How to Store Elderberry Syrup
- In the refrigerator—This elderberry syrup recipe will keep for 2-3 months when stored in a clean, airtight glass jar. Toss it if you notice mold, off smells, or fizzing.
- In the freezer—Pour cooled syrup into ice cube trays for single-serving cubes. Let the cubes freeze completely, then transfer them to a freezer-safe bag. They will keep for up to 6-12 months.
Frequently Asked Questions
If you’re on immunosuppressants, taking diuretics, or pregnant or breastfeeding, skip the elderberry. It ramps up immune activity, can be dehydrating, and honestly, the research just isn’t there yet for those groups. Bottom line: if you’re on meds or dealing with a condition, run it by your doctor first.
Elderberries aren’t exactly edible straight off the bush. To make them safe (and, you know, not toxic), cook them down. Boil for at least 30 minutes, or let them simmer for 30-45 minutes once you have a rolling boil. Stir often, don’t just walk away.
In a small pilot trial, people with flu-like symptoms took elderberry extract lozenges (175 mg, four times a day for two days) and—surprise, surprise—it actually helped. Symptoms were less intense and didn’t hang around as long.

Easy Elderberry Syrup Recipe
Equipment
- 1 sieve or strainer
- 1 Saucepan
- 1 large glass jar with an airtight lid, sanitized
Ingredients
- 1/2 cup dried elderberries
- 2 cups filtered water
- 2 cinnamon sticks or 1 teaspoon of ground cinnamon
- 1 1-inch piece of ginger root, thinly sliced
- 4 cloves
- 1/3 cup raw unfiltered honey
- 1 TBSP fresh squeezed lemon juice
Instructions
To Sterilize Your Jar:
- Sterilize your jar first. It's the easiest way to kill off any bacteria, mold, or yeast that could ruin your syrup. My go-to methods are in the notes below.
To Make Elderberry Syrup:
- Transfer 1/2 cup of dried elderberries into a stainless steel saucepan. Add the sliced ginger root, cinnamon sticks, and cloves, followed by 2 cups of filtered water. Heat the contents to a rolling boil on the stove, stirring occasionally. When the mixture reaches a boil, reduce the heat and let it simmer on low for 30 minutes, no less.
- Put a large bowl in your sink and, holding a sieve or strainer over the bowl, carefully pour the mixture through it so the strainer catches all of the solid pieces, allowing the liquid to go into the bowl. Use the back of a spoon to gently press down on the berries through the sieve, extracting as much liquid as possible. When done, discard the solids in the sieve.
- Leave the syrup to cool down to room temperature. This should only take about 20-30 minutes.
- When the syrup has cooled, whisk in the honey and fresh lemon juice until well combined.
- Transfer the syrup into the sterilized jar from the saucepan. I suggest using a funnel to prevent spilling.
- Store the syrup in an airtight, sterilized jar in the fridge for up to 3 months. (If you notice mold, off smells, or fizzing, discard it.)
Notes
- Wash jars and lids in hot, soapy water, then rinse well.
- Place the jars right-side up on a rack in a large pot or canner.
- Fill the pot with enough water to cover the jars by at least one inch.
- Bring the water to a rolling boil and boil for 10 minutes at sea level. Add one minute of boiling time for every 1,000 feet of elevation increase. (This matters!)
- Keep the jars in the hot water until ready to fill.


