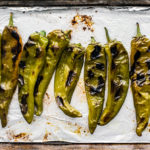
How to Roast Hatch Chiles
Learn how to roast Hatch chiles and how to store them for later use in chilis, tacos, casseroles, salsas, and more.
Ingredients
- Hatch chiles
- Olive oil
Instructions
- Position your oven rack to about 6 inches away from your broiler.
- Preheat the broiler. While it preheats, cover a baking sheet with tin foil.
- Spread the chiles out over the baking sheet and hit them with a drizzle of olive oil; toss to coat them evenly.
- Pop the baking sheet into the oven and broil the chiles for 5-7 minutes—or until the skin is starting to char and bubble. Then, carefully with tongs, flip them over and broil for another 5-7 minutes. When both sides of the chiles are charred, take them out of the oven. Set them aside and let them cool before handling.
- Once the chiles have cooled down, peel them and slice them open; discard the seeds. Roughly chop the chiles and store them in the fridge within two hours.
Notes
Tips for storing and freezing Hatch chiles.
- Roasted and peeled peppers should be refrigerated within two hours after being cooked.
- You can cover the roasted chiles right after they come out of the oven to steam them a bit, which makes the peeling process a little easier—though I've always had an easy time without doing this.
- Chiles should be completely cooled before freezing. If the peppers are placed in the freezer while still warm, bacteria may grow and become dormant during storage.
- Use shallow containers. If containers are too big, the peppers will freeze slowly and develop an ice crystal formation within the pepper tissue which results in a mushy texture.
- Whole peppers can be frozen unpeeled—they're actually easier to peel after having been frozen.
- After thawing, hatch chiles kick it up one full heat level.
- Hatch chiles can be stored in the freezer for up to a year; in the fridge, they're good for about three days.
