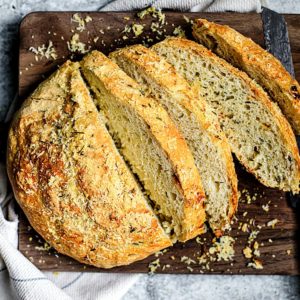
Easy Dutch Oven Bread with Roasted Garlic and Rosemary {No-Knead Bread}
This easy no-knead Dutch oven bread with roasted garlic and rosemary is great for hearty sandwiches, with pastas, dipped into soups, or on its own with butter.
Print
Pin
Servings: 8 servings
Equipment
- Dutch oven
- Plastic wrap
- (2) tea towels
- Tin foil
- Sheet pan or muffin pan (for roasting garlic)
Ingredients
- 3 cups All purpose flour
- 2 tsp sea salt
- 1/2 tsp instant yeast you can use active dry yeast (same amount), but your dough may take a little longer to rise.
- 1.5 cups warm water
- 1 head of garlic, roasted
- 2 TBSP finely chopped rosemary, plus more for garnish
- 1 TBSP olive oil
- 2 TBSP grated parmesan or pecorino romano (optional)
Instructions
To roast the garlic.
- Preheat oven to 400º F. Remove any of the extra papery outer layers of the garlic bulb, leaving the skins of the individual cloves of garlic intact. Cut about 1/4 inch from the top of the cloves to expose the tops of the individual cloves.Place the garlic head cut side up onto a square of tin foil. Drizzle about a teaspoon of olive oil over the bulb making sure to oil up those exposed cloves of garlic. Then, close up the foil creating a tent for the garlic bulb. Placed the wrapped bulb onto a sheet pan or in a muffin pan.Bake at 400° F for about 30-40 minutes, or until the cloves are lightly browned and feel soft when pressed.When ready, remove the garlic from the oven and set it aside to cool. Once cool, squeeze each roasted garlic clove into a small dish; set aside.
- To a large bowl, add the flour, salt, yeast, garlic, and rosemary. Stir until well-blended, then pour in the warm water, stirring with a fork or wooden/silicone spoon until the mixture becomes gluey and a bit shaggy. Lift your dough a bit to check and see if there is excess flour beneath it. If so, add a splash of water to the excess flour and combine it with the gluey dough. If you skip this step, you might end up with a few hardened floury bits at the base of your dough.
- Cover the bowl tightly with plastic wrap and set it to rest in a warm area of the house for at least 10-12 hours (or overnight). I leave mine on the counter near my dishwasher if it's been running. You could also leave it in a humid laundry room.
- When your dough is ready: prep a clean surface, either a wooden cutting board or your counter. Toss a generous amount of flour over the surface to prevent sticking. Unwrap the bowl of dough, set the plastic wrap aside, and gently peel the dough out onto your floured surface. Toss a small amount of flour over the top of the dough. Then, grab one side of the dough and fold it over itself once or twice.
- Drape the plastic wrap over the dough and let rest for 15 minutes. In the meantime, prep two clean tea towels; generously flour one of them, and set them aside.
- After 15 minutes minutes, discard the plastic wrap. Grab each of the four sides of the dough one by one and pull them to the center to shape your dough into a ball. Once all sides have been folded, quickly but carefully flip it over so that the smooth side is face-up and seams are face-down. Place the dough onto the floured tea towel, and sprinkle a bit of flour on top. Cover with the other tea towel and let it rest for two hours, or until your dough has doubled in size. (Note: if it's cool in your house, this process might take a bit longer.)
- 20 minutes before baking time, preheat the oven to 450º F and place your Dutch oven inside the oven with the lid on. This heats it up, creating a warm space for that dough. Once the oven reaches 450º F, take the Dutch oven out, set it somewhere safe, and remove the lid. Remove the top tea towel from off the dough, slide your hand underneath the dough, flip it over in your hands and carefully transfer it into the dutch oven, seam-side facing upward (I do this over the sink to minimize the splash of flour). If the dough sticks to the towel at all, simply peel it off and use more flour on the towel next time.
- Place the lid back onto the Dutch oven and return to the oven for 30 minutes. Once 30 minutes has passed, take the Dutch oven out of the oven. Remove the lid. Gently brush about a tablespoon worth of olive oil over the top of the bread, then sprinkle with grated parmesan or pecornio romano and some extra rosemary, if you left aby aside. Place the Dutch oven back into the oven, uncovered, and bake for an additional 10-15 minutes, or until the top crust is a gorgeously crackled golden color. As a test, you can tap the loaf with the back of a spoon; it should sound hollow.
- Remove the Dutch oven from the oven and, with a silicone spatula or wooden spoon, carefully transfer the bread to a cooling rack to cool completely (or for however long you can stand to wait, which in this house, is five minutes). Use a large serrated bread knife to slice into it. Slather butter onto a slice and mow down. I always encourage the straight-out-of-the-oven taste test ;)
Notes
- In total, this recipe requires 30-40 minutes of cooking time to roast the garlic, 5 minutes of prep, 10 hours of idle time to let the dough rise, and 40-50 minutes of baking — so plan in advance.